

Using smileys and other small images in
Outlook Express email.
Once you've learned the technique, you'll find it so
simple!
The first thing you'll
need are some smileys of course! You can use the ones below
if you like--I made them myself. Other-click and "Save As" to your
hard drive. If they don't save as gifs, you can get a zip of them here.
Since it's easy to find, a handy place to keep your little guys might be
in a "Smileys" folder inside your "My Pictures" folder.


I could guess you've
probably got Outlook Express ready to roll--but just in case something's
amiss these one-time settings applied before-hand will straighten you
right out (especially if you're using OE 6!):
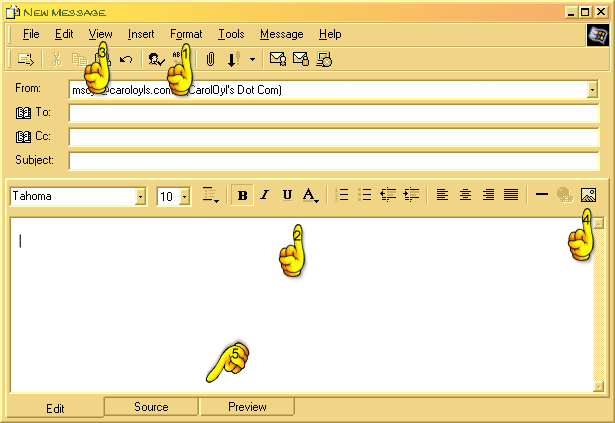
- Make sure you have OE set up to send pictures--OE 6 by default is set up NOT to! (Well duh!) Under "Format" on the New Message's main menu look to see that "Send Pictures with Message" has a checkmark next to it. (finger #1)
- Also be sure you have the "Formatting Bar" in view. It's in the middle of the message (finger #2). If it's not there, turn it on by clicking the menu's "View/Toolbars/Formatting Bar." (finger #3)
- It's also nice to have the "Edit/Source/Preview" tabs available so you can see your progress. (finger #5) If they're not in sight, turn them on by clicking "View/Source Edit." (#3 again)
Okay, start typing. After you've got
some text entered in the New Message's body, it's time to emote--and
here's how to do it:
- Add a space after the word where you'll be putting your little feller, then click the "Insert Picture" icon on the Formatting Bar. (finger #4) The following dialog box will open so you can browse to the Smileys folder or wherever it was you put them. After you've found the one you want and clicked OK, you'll be back in the dialog box and the address for your little guy will be entered next to "Picture Source."
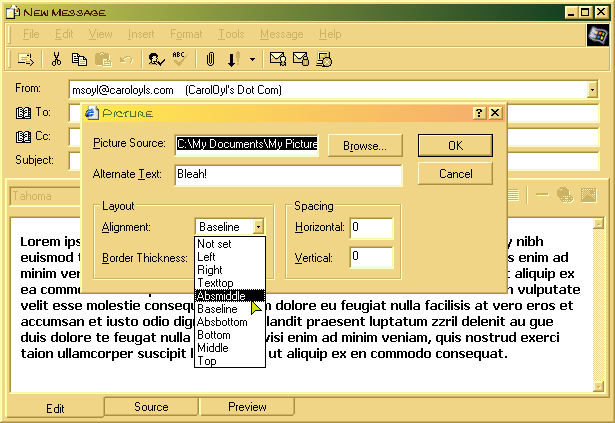
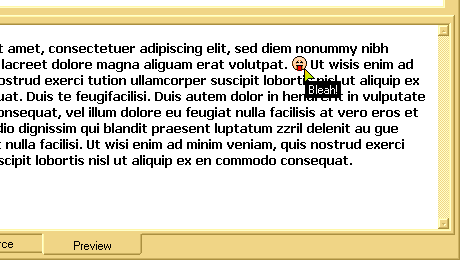
- You can then use the "Alternate Text" option to add a "tool tip" type of message to your picture that will show up when a mouse moves over it. I've typed in "Bleah!"--the emotion expressed in my chosen smiley.
- Below that are "Layout" options. For "Alignment," you might decide to center the smiley between the lines of text. For this pick "middle" or "absmiddle" from the drop-down list. The default is "baseline" and that will align the bottom of your little pic with the bottom of the line of text. You can leave it set there--but don't use "left" or "right" as this will move your little guy to the edges of your letter! (L/R are for inserting big pictures that you want text to wrap around.)
- I seldom use an HTML border around any of my pics, so I usually leave the "Border Thickness" option blank. If you want a border, enter a number for how many pixels wide you want it to be. The default border color is black.
- With an image as small as a smiley, there's no need to worry about the "Spacing." You can space them with the spacebar! (Spacing is another option for inserting big pictures when you don't want your text to wrap smack dab up against them.)
- Click OK.
- Click the Preview tab to see how it works.
Now save or send your email to make sure OE remembers any settings
you might have changed. If you've chosen to save it, you can go into
OE's Drafts folder and delete it since it's served its purpose.
Some tips and tricks:
- If after you've clicked OK, you decide your smiley needs an
adjustment, just click on it.
 A "bounding box" of little squares will appear
around it, and your cursor will change to the "move" cross. Then
click the Insert Picture icon again on the Formatting Bar. All
your smiley's settings will be in the dialog box ready for you to
readjust.
A "bounding box" of little squares will appear
around it, and your cursor will change to the "move" cross. Then
click the Insert Picture icon again on the Formatting Bar. All
your smiley's settings will be in the dialog box ready for you to
readjust.
- If you want to move your smiley, just click on it then grab it with your mouse to drag and drop it somewhere else.
- If you've already used a smiley in your letter that you want to use
over in a different place, you don't need to browse to insert it
again. Instead you have two choices:
- You can click on it to highlight with the bounding box, then other-click and copy and paste.
- You can hold down a "Ctrl" key and grab the smiley with your cursor (which will change from the cross to a pointer trailing a little box and plus sign) to drag and drop a duplicate in another location. Let go of the mouse button before you let up on the Control key or you'll end up just moving the smiley instead.
- *A word of warning here: one of OE 6's (but not OE 5.5's) patches contains a bug that prevents it from embedding duplicate images in email. If this is a frustrating problem for you (as it was for me!) you can get the fix from this page at Letterman's site. He offers a download and instructions for installing an older version of inetcomm.dll that will get your OE back up to snuff.
- To get rid of a smiley, click on it to bring up the bounding box then hit the Delete key.

If you've
found this tutorial useful, and would
like to have it for reference, feel free to click
File/Save As and stash it on your hard drive.
like to have it for reference, feel free to click
File/Save As and stash it on your hard drive.