 Version: I used PI 8
Skill Level: Intermediate
Featured tool:
Paintbrush
NB: If this page is acting strangely, other-click and "Refresh" or "Reload" (that is, click whichever mouse-button you use to bring up context menus--for me it's the left ;-) PhotoImpact users have been clamoring for years
for an updated version that includes "brushes"--but truth is that even old
PI 8 has the ability to create, use, save, and even share
brushes.
I have a copy of Paint Shop Pro I use mostly for
exporting tubes as PSDs (for PI '-)--but I have applied a few of its brushes
to canvas just to see how they operate--and PhotoImpact can make the same
kind of images! Now I don't claim to know everything about creating
and using PI brushes: while I know PI can do the deed, I'm missing
some really important info like, for instance, how to assemble a comely
collage--and I'm relying on you to help me with the process
'-) So this tute is just to let you know what I've discovered and to
help you get started making brushes with and for
PI.
|
|
Creating a Brush
is similar to making a Paintbrush Cutout
with a few notable exceptions:
The brush image can be in any one of a number of
file formats--I've made successful brushes from colorful JPGs, PSDs
(with or without transparency--layers will be merged by the brush), and
256-color GIFs and PNGs with or without transparency (their masks must be
white for the brush to make them totally transparent). Other formats
remain to be tested but unfortunately--and strangely--UFOs won't work!
True-color transparent PNGs aren't useful either since it appears there's
a problem with their masking. |
|
1. Click the Paintbrush tool icon |
|
2. Create and save a collage (you're on your own with that '-)
or choose a saved image to use for your brush. A size of 500x500
pixels or less will be most convenient. If you're rummaging your
hard drive you'll find PI's Browse Manager helpful in giving you
information about possibilities--like size and color depth. I'm
using a scrap
tag a PSP-user friend made for me (since I'm totally handicapped in
both the collage and tagging departments :-| ) It's a
quality JPG with a white background and a beauty just the way it
is. |
 |
|
3. You can other-click a browsed thumb and choose "File
Information" for more specifics. (I like to highlight and Copy the
file's path.) The File Information's "Advanced" button will tell you
if the image contains transparency. |
  |
|
4. For this tute, open a 500x500 white canvas, then invoke the
Paintbrush and its Brush Panel using these settings: |
|
5. Texture tab: Click on the "Add Texture" icon and
browse to your chosen image. (If you've copied your pic's location
from the File Manager's "File Information" sheet, just other-click and
paste it into the "File name:" line in the dialog box.) Take note of
your image's dimensions. |
 |
|
6. Shape tab: Highlight brush width and height and type
in the image's dimensions. Click the Rectangular Brush icon and set
Soft-Edge and Brush Angle to zero. |
 |
|
7. Options tab: Apply method: Always; Transparency: 0;
Lines: Freehand |
|
8. Color tab: Single Color, #B45340 |
| 9. On the Paint Attribute Toolbar: Set the Mode to "Paint as object." |
|
10. Line up the brush with the top and left edges of the canvas
and click the mouse once. The reason for this precise size and
positioning is that we don't want this "texture" to tile like a normal
paintbrush texture would. |
 |
|
11. Click the "Paint as object" icon again to exit that
mode. Here's my cropped brush object with the background hidden so
you can see its natural transparency: |
|
12. If you like what you've done, you can add a preset for your
brush and texture settings to your EasyPalette--just click Add on the
Paintbrush tool's Attribute Toolbar. (The preset will save all but
the "Paint as object" function--you'll have to remember to do that
yourself '-) |
|
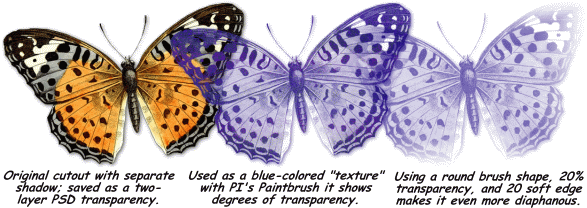
That's it! Now that you know the basics,
it's up to you to discover the brush styles you like best. You can
use both the Attribute Toolbar and the Brush Panel to adjust transparency,
color, brush shape, soft edge, merge mode, etc. . . . You can even
paint your brushed image or fill it with gradients or textures. The
mind boggles with possibilities! This simple example uses a Dover
butterfly I cut out (the hard way '-). |
 |
|
Tips and Tricks:
If you have any questions about or suggestions for
this tutelage, or if you can help me create a nice collage '-), please
click my sig and send me a note.
Be creative! Have fun :-)) |
 |